Wishing my nieghbors a Merry Christmas. :) No better way to do it than with homemade coconut cake bites. 


 |
Black Forest Cupcakes |
 |
| My Kiddos loved the Photo Booth. I found this amazingly perfect red & creme ticking stripe fabric at Wal-Mart of all places. I just got 2 yards of fabric, stretched it over and staple-gunned it to some extra plywood that my hubby had...in fact...my hubby is so awesome that he actually stretched and tapled it FOR me. Aren't you jelous of my hubby?? |
 |
| Black Forest Cake. I went rustic because I wanted that 'Vintage' feel. The sign was made by digging this piece of wood that I already had from an earlier craft that never got finished out of my craft stuff. It was actually already painted the colors that I wanted so I simply printed a font off my computer, cut them out and glued them to the sign. I also grabbed some gold paint that I had in my craft stash and roughly outlined the letters then added flourishes around the edges. |
 |
| This is my SIL's backyard. it was a great size and location. We used lots of ladder-back chairs and the photo booth is just around the corner. It's hard to see all of the mason jars in the picture but they really did make an impact in person. |
 |
| Bubble Gum everywhere. I loved the color that they provided. They were put in baby jars because...well...it's a baby shower. :) |
 |
| I was so thrilled when I found these popcorn bags at my local Kitchen supply store. |
 |
| Me with the Lady of the Hour. Love her. K, so this is NOT a flattering picture of me but it was so fun taking it! :) |
 |
| The 'BIG BROTHER"!! |
 |
| Photo Booth Props: Hats, clown noses, paper mustaches & bow ties on skewers, chalkboard, chalk. |
 |
| "Guess the Girth" booth. A new twist on an age-old baby shower game. The same process for the "Tickets" sign at the Dessert Table was basically repeated for this sign except that I had to start from scratch. I had my hubby cut the sign out of MDF then I found leftover paint in the colors that I needed (just a lucky coincidence) and painted away. Then I attatched the paper letters and added some gold detail. |
 |
| I wanted the games to be baby-inspired. My Lizzy came up with this one. It was a hoot. I got these beautiful wooden spools from my local Electrical Supply store. I offered to pay for them but they just gave them to me. :) |

 |
| Aaaaand...back to the food. Caramel Apples...need I say more? It's been way too long since I've had one. I picked the smallest apples that I could find then found these corn skewers in the produce section at Wal-Mart. They were so cute. I made them simple and rustic to go with the vintage theme. |
 |
| Loved the dark glass bottles. In retrospect, this would've been a good opportunity to put a lovely little clever message to the little peanut on here instead of just the boring "Old Fashioned Root Beer". Everything is better in retrospect. :) |
 |
| The dessert table minus the Churros. They were still in the oven. |
 |
| Again with no Churros but now you can see the banner. ;) |

 |
| Can't do "Carnival" without doing Nachos. I know it's not "dessert" but it is "yummy". ;) |

 |
| Oh look the Churros made it. :) They should have been put in a cute container but oh well. The guests were eating by now and the light was getting bad. |
 |
| Makes you hungry, huh? I totally want another Churro right now. |
 |
| "Ambiance Lighting" :) Just Mason Jars that I wired and hung from the fence with tea lights from the dollar store! |
 |
| I just added this picture because it was funny. ;) Don't worry...it's just root beer. |
 |
| My sweet niece made these plus a pretty blue on for me. Super fun. |
 |
| We invited these boys to the party to help us eat the food and to provide us some entertainment. ;) |
 |
| This was what the party looked like after we all ran for cover from the wind storm. :) |
 "Charlotte Cake". Cheesecake topped w. fresh berries and wrapped in Lady Fingers.
 Red Velvet w. Cream Cheese Buttercream. Garnished w. fresh berries and red Gumpaste Leaves.


 Gumpaste Tutorial:
 To Begin:
 *Get a boulder-sized {'boulder' as in way back in the day of playing marbles} ball of gumpaste.
 *With a super-thin coat of cornstarch on your mat (or surface; you really don't need the mat) and rolling pin, roll out your gumpaste as THIN as you can get it. I'm talking, PAPER THIN.
 * Cut out your circles and place them under the practice board (or ziploc baggie) to keep them from drying out.
  *Place the largest circle on your thin foam pad and place your ball tool half-way onto the foam and half-way onto the gumpaste.
 *Make sure you have a thin layer of cornstarch on your ball tool and with a fluid motion, rub tool around your gumpaste's edge to create the ruffled edge.
 *As you finish each circle, use your piping bag to adhere each circle to the next.
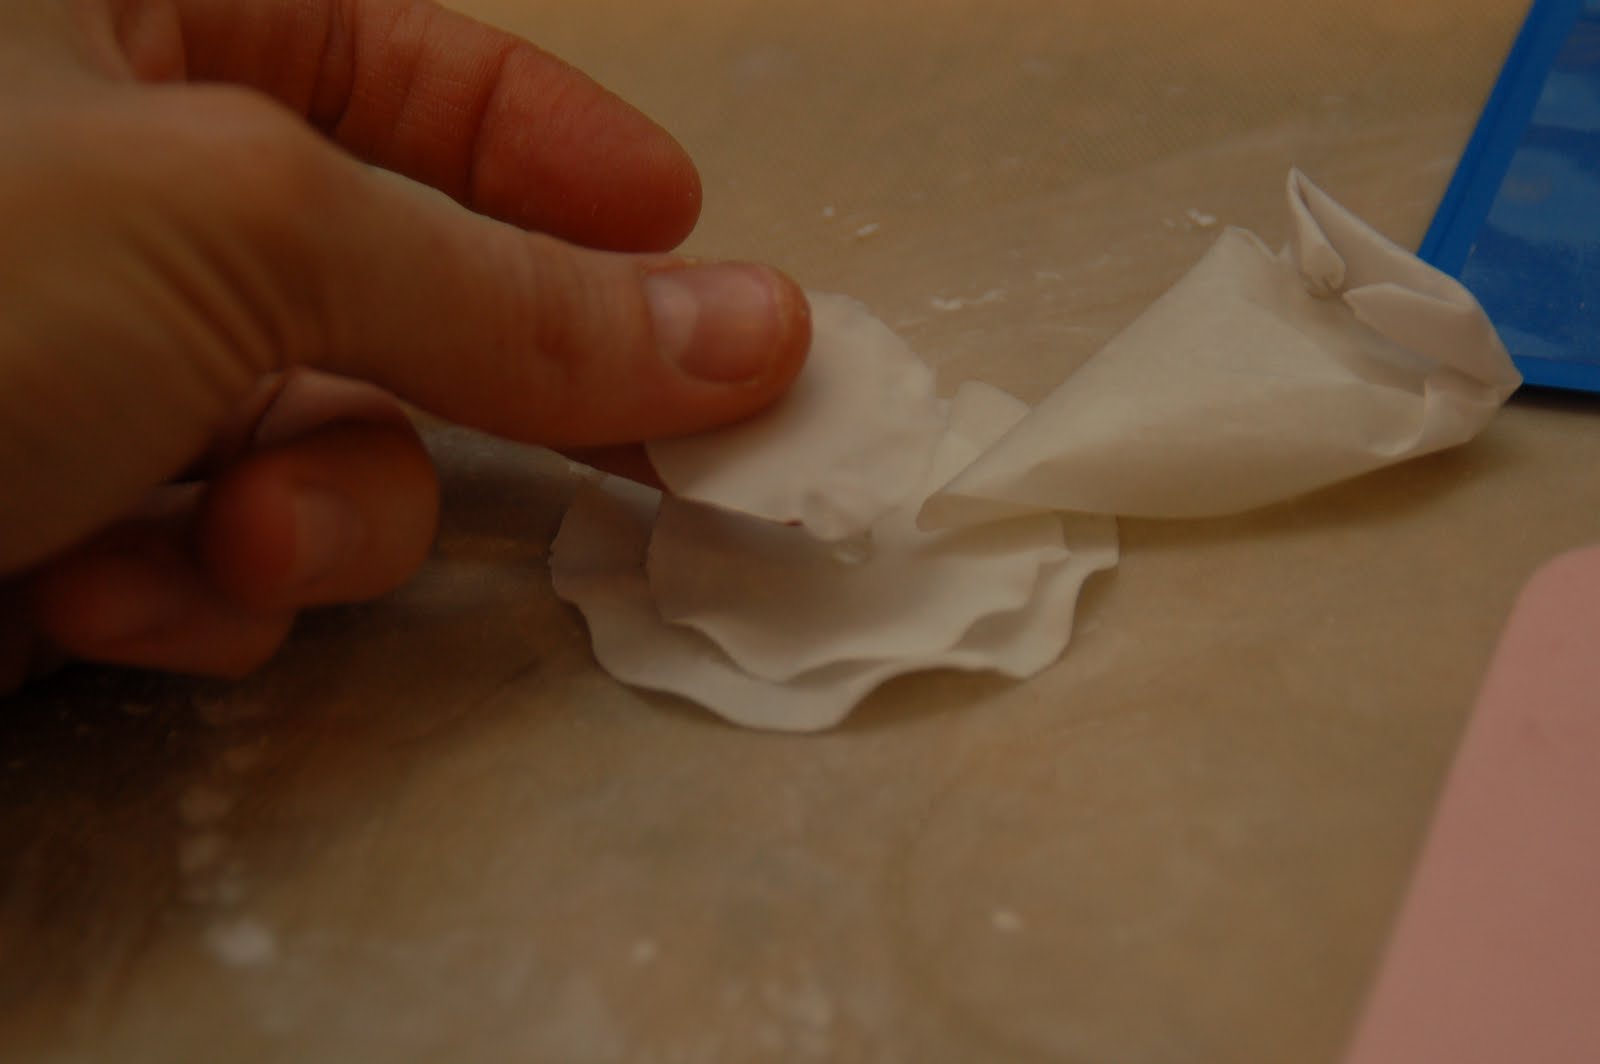 *To make the Dragge center, place a (very small) pea-sized drop of piping gel in the center of your smallest flower.
 *With your tweezers, place a large dragge in the center of the piping gel drop.
 * Through trial and error, I have found that the easiest way to place the teeny-tiny dragess in place is to pour a few around the center dragee...
 *...then sort them with your tweezers.
 *Let the flower dry at least 8 hours before assembling them on the cake {or cupcake! They make SUPER cute cupcake toppers!}.
 Happy baking, everyone!